We may earn a commission when you purchase through affiliate links. Learn more.
Anyone who browses my Twitter or Instagram profiles knows that I am a huge fan of long exposure photography. If you’ve never heard of this technique, you might be asking yourself, “What is long exposure photography?”
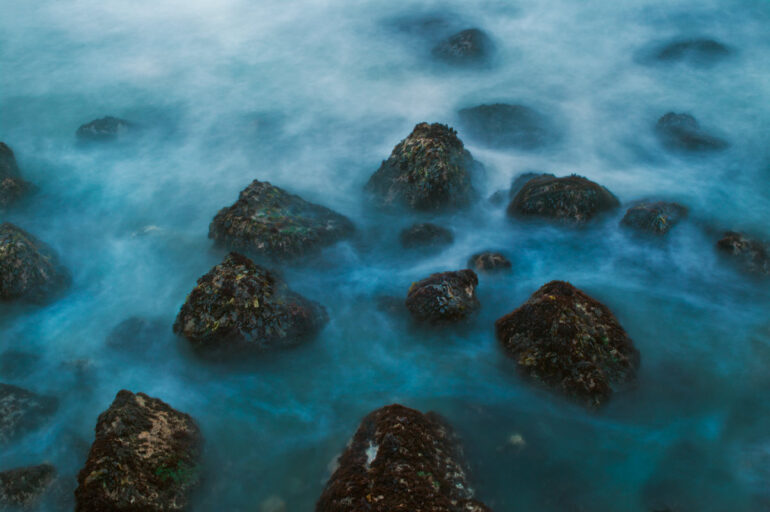
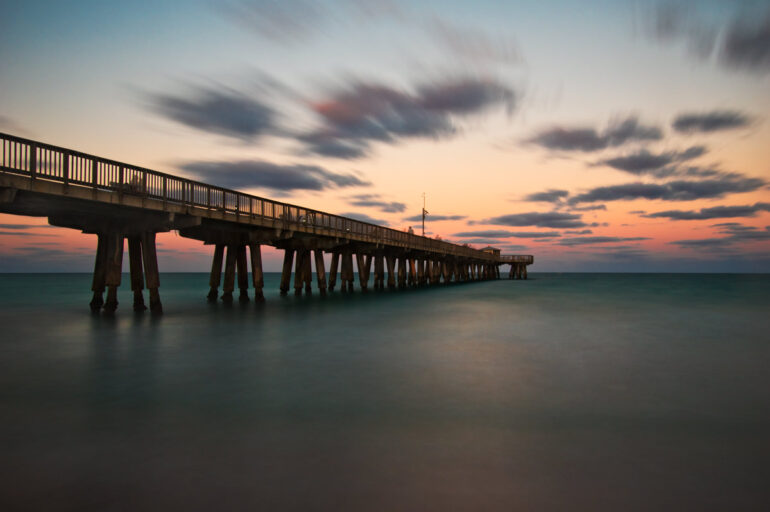
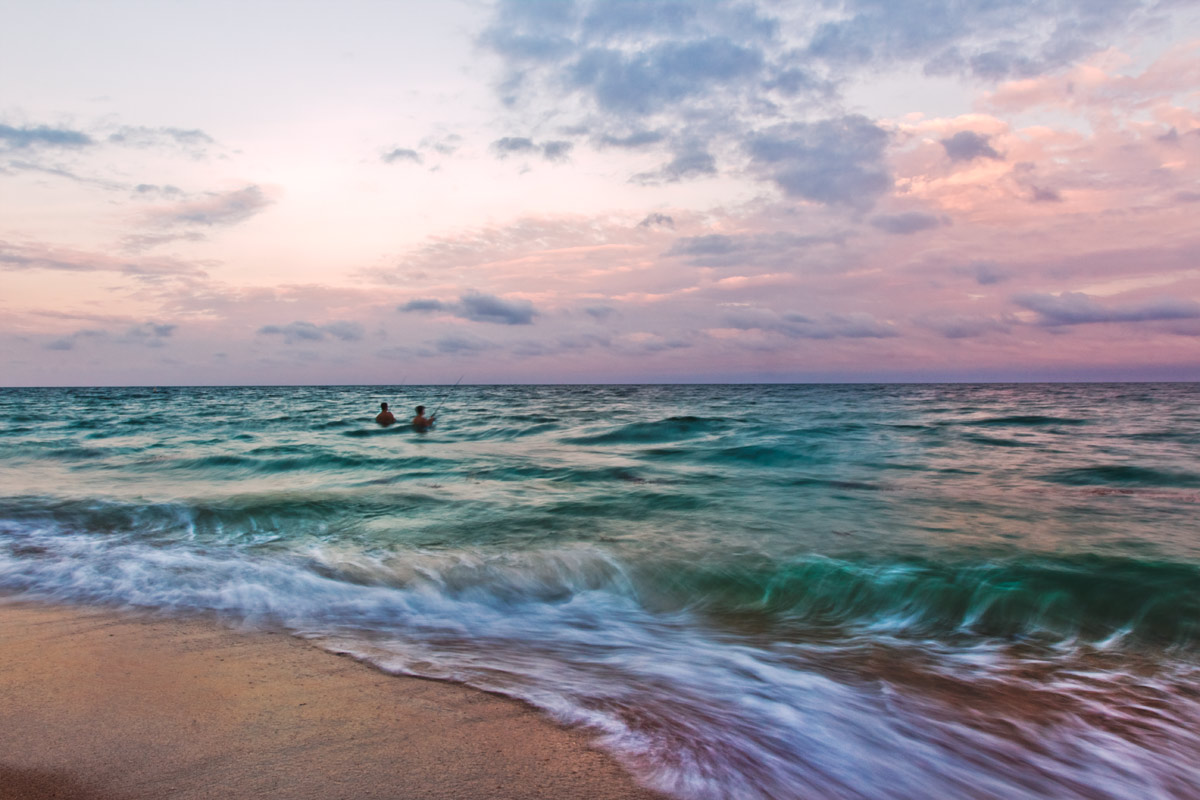
Long exposure photography is all about using longer shutter speeds to emphasize areas of movement in a photo. Using shutter speeds ranging from fractions of a second like 1/4 to exposures that are hours long can make for dreamy, ethereal photos. This type of photography is perfect to experiment with when photographing all kinds of subjects like moving crowds, waterfalls, seascapes, rivers, landscapes, and architecture. Anything in motion will be blurred — the longer the exposure, the softer the motion blur.
If you’re new to photography, you probably have been doing everything you can to avoid blurry photos, so you might find yourself wondering why anyone would want part of their photos to be blurred.
Why use a Long Exposure?
While most casual photographers simply snap a quick photo when they see something interesting, long exposure photography requires patience and an intimate understanding of photographic composition.
Long exposures are great for photographing scenes in low light conditions. Leaving the shutter open for longer allows more light to reach your sensor, allowing you to take pictures in very dark situations. When photographing unpredictable bursts of light like meteor showers, fireworks, and lightning, a long exposure increases your chances of capturing the action and results in a more balanced and properly exposed photo.
Long exposure photography keeps static elements of your scene sharp, while smoothing and blurring moving elements, helping to create a visually appealing photo that softens the details on these moving elements, removing distracting details like individual waves, walking people, cars, floating debris, etc.
What do you Need for Long Exposure Photography?
A Sturdy Tripod
A tripod is one of the most essential pieces of photography equipment that you’ll need to take long exposure shots. Because you’re leaving the shutter open for longer, any movement of the camera will result in photos that are entirely blurred — with a long exposure, we only want the moving parts of the photo to be smooth. A good tripod will keep your camera steady while the shutter is open — avoid the ultra-cheap plastic tripods that you can buy at drug stores; they might be fine for vacation snapshots, but they aren’t designed to keep a camera totally motionless for long exposure photography.
While there are tripods with four figure price tags, you don’t need to break the bank to get a high quality tripod. That said, your tripod is an important piece of equipment that should last for many years. If you start with a high quality aluminum or carbon fiber tripod to begin with, you might spend a little more initially, but in the long run you will save yourself money by not having to replace a cheap, broken tripod every year.
Tripods like the Slik Sprint Pro II Tripod, Manfrotto 190XPROL, Induro AKB1, and the Oben AT-3400 are all highly rated tripods that can be bought for under $300, some for only around $100. If you really want to explore the world of long exposure photography but can’t afford a full-size tripod right now, the GorillaPod SLR Zoom is a very handy little tripod that you can attach to just about anything.
A Camera with Manual Exposure Control
To shoot long exposure photographs, you’ll need a camera that allows you to control the exposure manually. More and more compact cameras these days offer at least some manual exposure control and all DSLR and mirrorless interchangeable lens cameras will allow you to manually control the three exposure variables — aperture, ISO, and shutter speed. For long exposures — especially those taken at night, a larger sensor like those found on interchangeable lens cameras is an asset, since large sensors tend to produce less noise in photos.
While many professional landscape photographers who shoot long exposures regularly use full frame cameras like the Canon 1Dx, you’ll still be able to get great long exposure results with much more affordable cameras.
A Neutral Density (ND) Filter
This is an optional accessory for shooting long exposure photography, but it’s exceptionally useful if you’re going to be shooting during the daytime. Designed to reduce the amount of light that passes through the lens and reaches the digital camera’s sensor, an ND filter is unnecessary in low light conditions, but is an absolute must if you want to shoot long exposures during the day with most lenses. Without a Neutral Density filter, you’ll often need to use a high f-stop, but using one will allow you to use a low f-stop, giving you a shallow depth of field that is especially desirable when photographing many subjects.

- Reduces the amount of light to the camera sensor by 9 f-stops without effecting colour balance
- Can be used to achieve super slow shutter speeds in daylight to render moving subjects invisible
- Enables slow shutter speeds to be used to record movement in subjects such as waterfalls, providing a...
- Decreases depth of field by allowing wider apertures to be used, helping to separate subjects from their...
Made of semi-transparent glass, Neutral Density filters are not cheap, but luckily you can still have a lot of fun shooting many types of long exposures without one. You won’t be able to shoot in very bright sunlight, but you’ll still be able to take great long exposure shots in lower light. If you decide that you really love long exposure photography, an ND filter is an investment you won’t regret.
Neutral Density filters come in a variety of strengths and — additionally, variable ND filters are also available, allowing you to rotate the filter to choose how much light you want to allow through. While you can get away without using ND filter if you plan to shoot at night or in the very low light you might find in a thick forest, a nine or ten stop Neutral Density filter allows photographers to shoot long exposures in bright sunlight — something that would be impossible without the light blocking capabilities of these filters.
Because these filters are relatively pricy, most photographers buy one that fits their lens with the largest filter thread. To use the ND filter on their other lenses, an inexpensive step up ring adapter set can be purchased like this one by Fotodiox, which comes with 7 adapter rings, so that you can use one filter on all of your lenses.
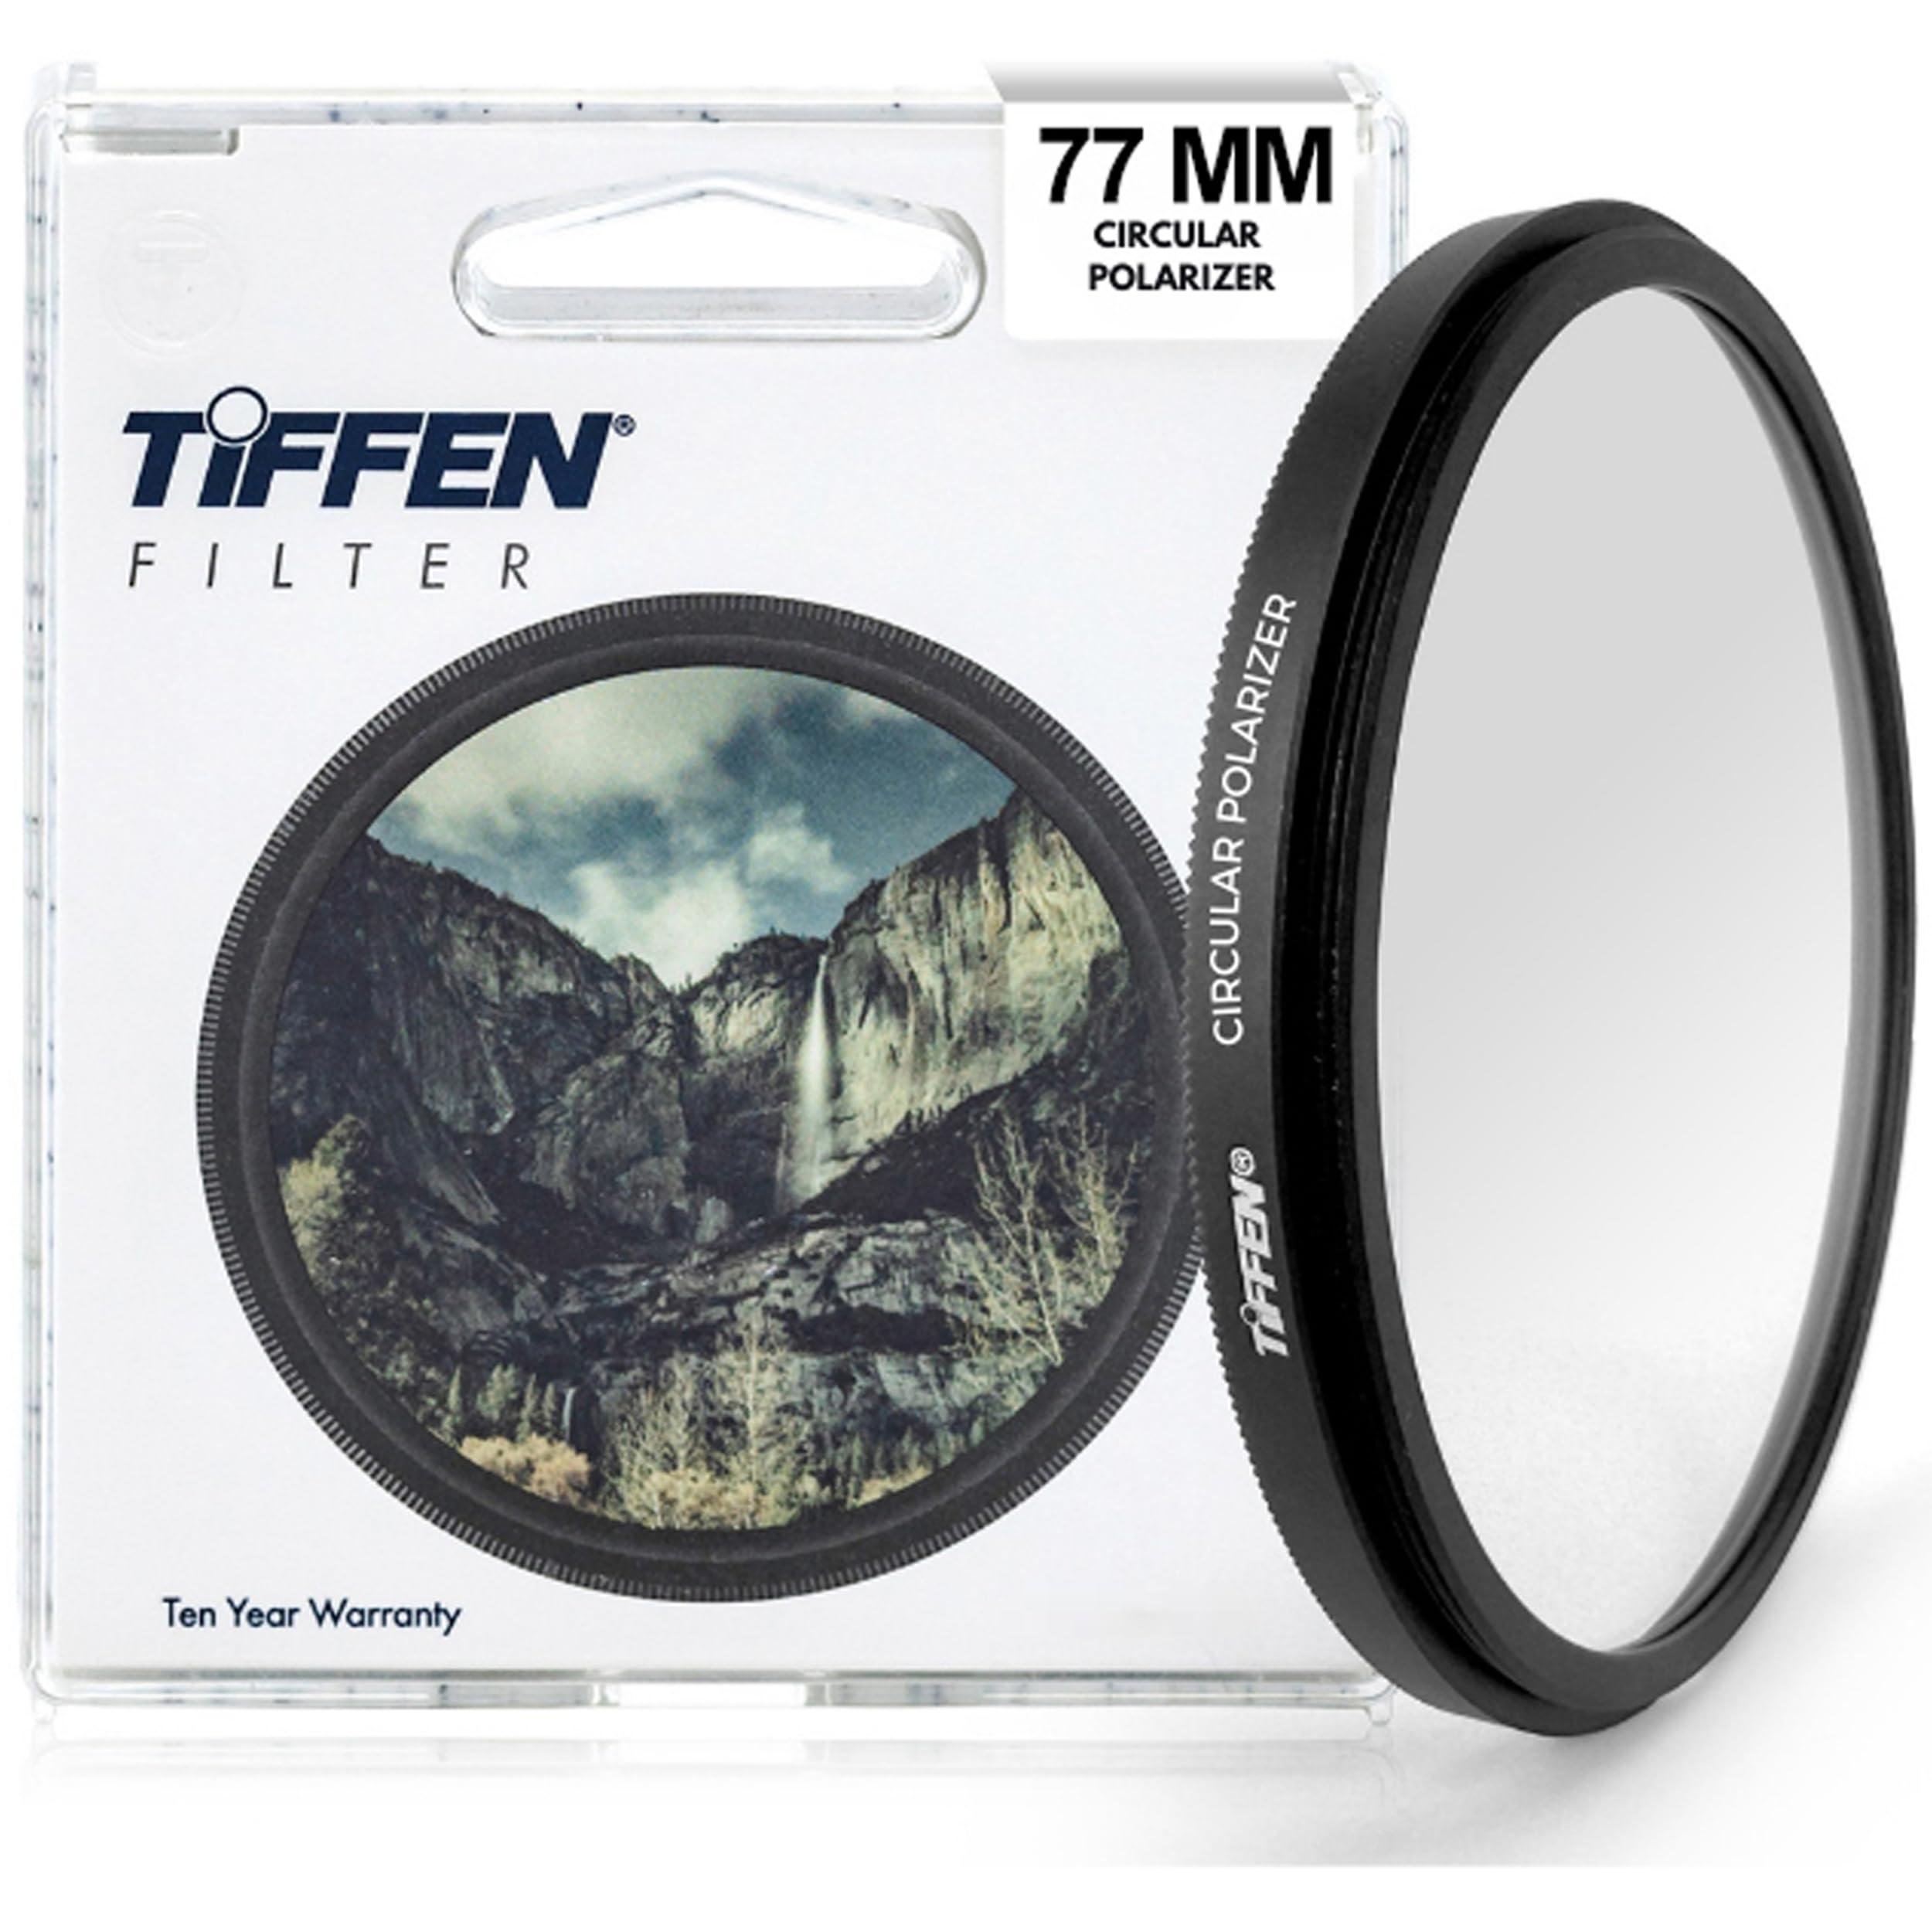
A Polarizing Filter
Depending upon what you’re photographing, you may want to add a polarizing filter to your lens. This filter will help increase color saturation and contrast, reduce reflections on glass, leaves, and water, and typically block around 2 stops of light.
You can stack an ND filter and a polarizing filter to get the benefits of both, for instance when photographing a waterfall, river, or the ocean during the day. The Neutral Density filter will allow you to keep the shutter open for longer, smoothing the flow of the water in your photo, and the polarizer will cut the reflections on the water’s surface.
- ULTRA-SLIM AND DURABLE FRAME: The Tiffen Circular Polarizer slim 77mm ring design ensures there’s no...
- Classic Circular Polarizer for Color & Contrast Control: Reduces glare and unwanted reflections from...
- Smooth Rotating Polarization Control: Allows precise adjustment of polarization intensity via a smooth...
- IDEAL FOR PHOTOGRAPHY AND VIDEOGRAPHY: Tiffen Circular Polarizer filters are ideal for all types of...
Extra Camera Batteries
Taking long exposure photos can really eat up your camera’s battery. Nothing is worse than being in the middle of photographing something beautiful like the swirling waves crashing on the rocky seashore at sunset, only to have your camera run out of battery. You can avoid this sort of painful situation by carrying a second or even third charged battery for your camera. Some photographers will only use the batteries sold by the camera manufacturer — these tend to be fairly expensive. Other photographers, myself included, prefer to save a bit of money with third party batteries like these, made by a brand called Wasabi Power which has a good reputation.
Long Exposure Advice
Shoot in RAW
I’m a big believer in always shooting in RAW, but if you need some convincing as to why it’s a better format for long exposure photography, I’ll indulge your curiosity. When you take a photo that’s recorded as a RAW file, the camera’s sensor data is preserved in the file without any of the camera’s processing algorithms applied to it. When you take a JPEG photo, the camera applies it’s processing algorithms and discards the data it didn’t use. Modern digital cameras are powerful pieces of technology, but your home computer or laptop is much more powerful and will allow you to make better processing decisions manually.
Because a RAW file preserves all of the light information and a higher dynamic range from the sensor in an uncompressed file, you are able to recover more details from dark shadows and bright highlights than you would be able to with only a JPEG file. With a long exposure photograph, being able to process the image manually is very important — long exposures can introduce strange color tints to a photo from light sources (and from the filter you use) that might not be visible to the naked eye but that can change the colors in a long exposure. RAW will allow you to modify the color temperature of your image without losing any quality in the image.
Long exposures, especially those taken at night, can also introduce digital noise into your images which is easy to minimize during RAW processing. While shooting in RAW is the best choice for serious photographers, the files created are significantly larger than JPEG images — be sure to bring a large enough memory card.
Understand How Exposure Works

If you’re new to digital photography, you’ll need to spend a little bit of time learning how exposure works. Because a long exposure keeps your camera’s shutter open for a longer period of time, you have to know how to compensate for the shutter speed by adjusting your ISO and Aperture and potentially adding a Neutral Density filter to your lens to reduce the incoming light.
The longer you leave your shutter open for, the more any moving elements in your photo will be blurred. Practice with different shutter speeds to see how the results vary. As with any type of photography, we typically want to avoid overexposing and underexposing parts of the photo. Shooting in RAW can help recover some lost tonal detail, but getting it as close to perfect in camera will make your final processed photo even better.
To get an understanding of how exposure works, start with our guide to Making Sense of Exposure, which will explain each exposure variable. Next, you’ll can use these easy to follow tutorials to learn all about Shutter Speed, ISO, and Aperture, which is controlled by your F-Stop settings. Because your aperture also affects your depth of field (that’s how much of your image is in focus), you can learn about their relationship in this guide to Understanding F-Stop and Depth of Field.
Long Exposure Photography Examples
While most newcomers to long exposure photography stick with basic subjects like landscapes and seascapes, there is an entire world of possibilities for the photographer to explore. One of my favorites is long exposure star photography, which you can learn about in my tutorial here. To keep this tutorial from becoming overly long, I’ve created a second page with examples of long exposure photography ideas along with the techniques used to capture them. Just click the button below to open that page! If you found my tutorial helpful, be sure to use the social sharing buttons below to let your friends know about it.
If you want to keep learning more about long exposure photography, be sure to check out these tutorials as well:
Daytime Long Exposure Photography Tutorial