We may earn a commission when you purchase through affiliate links. Learn more.
The ocean is a magical place. Whether the seas are calm or rough, the skies overhead dark and moody or sunny and filled with radiant light, the coast and the ocean has always been a place that people have turned to for tranquility.
For photographers, the coastline affords a nearly endless array of photo opportunities. Capturing mesmerizing seascape images isn’t without a few challenges though. In this article, we’ll outline several tips you can use to get the best seascape photos no matter what kind of camera you’re using. One of the most important ingredients of a seascape is the special sense of atmosphere the coast offers — be sure to check out our Photography Tips for Capturing Mood and Atmosphere.
1. Be aware of your shutter speed
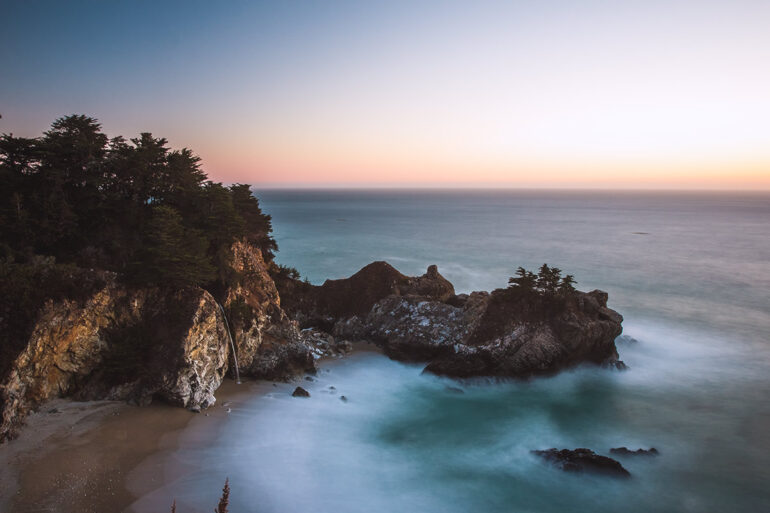
When shooting seascape photography, it can often be a difficult decision to choose between a long exposure of the scene that smooths the motion of the ocean into ghostly swirls, and a normal exposure that freezes the churning water action and texture of the waves. There’s no “right way” to shoot seascapes — beautiful photos of the ocean can be taken using either approach, and I often like to shoot a mixture of both long exposure and regular images.
When photographing long exposure seascapes, there are a few things you’ll definitely want to bring along.
A. A sturdy tripod. You don’t need to spend lots of money on a tripod, but you do want one that’s built well. For a few great affordable options, check out the MeFOTO Roadtrip and Oben AC-1441.
B. A shutter release cable. Just pressing the shutter button is often enough to produce blurry long exposure photos, since even a light touch can shake the camera. Using a shutter release cable will let you trigger a photo without even needing to touch your camera!
C. A Neutral Density filter. Neutral density filters, often abbreviated as ND filters reduce the incoming light, making it easier to use longer exposure times. The stronger the ND filter, the more light is blocked, and the longer the exposure time can be.
2. Find out the tides
Preparedness is half the battle when it comes to getting amazing photos, and finding out when high tide and low tide are will help you plan for great seascape photos. Depending upon the terrain of the shore you’re photographing, you might find that it’s much easier to shoot great compositions when the tide is at a certain point. For instance, you might find that a rocky shoreline is more picturesque at low tide when more of the rocks are exposed.
3. Time it right
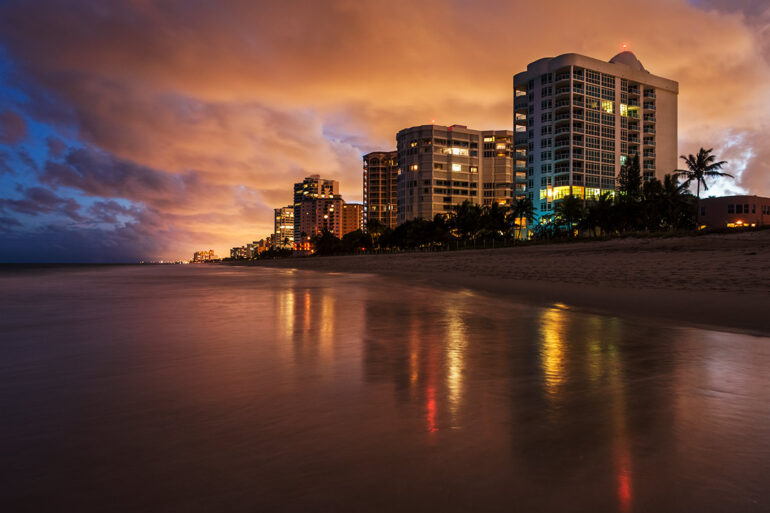
Light is that essential ingredient in every photo, and knowing when the right time to shoot at is can really help improve the quality of your seascape photos. Beautiful seascapes can be photographed at any time of day, depending upon the location, but certain times of day like sunrise, sunset, and the “golden hour” shortly after sunrise and before sunset really lend themselves to great photos. Be sure to pop over to our sunset photography tips too!
4. Keep an eye out for waves
If you photograph seascapes often, you’ll undoubtedly end up with some wet shoes from time to time, and if you’re not careful you can even end up getting seriously injured or watching your camera sink into the sea. Waves can be sneaky — if you turn your back on the sea for even a few moments, you can easily find yourself being splashed by a huge wave that seemed to come from out of nowhere. Never underestimate the power of the ocean — it’s unpredictable and incredibly strong.
When doing seascape photography, I always keep my hand hovering right next to my tripod, to grab it at a moment’s notice if I think a wave is going to get too close. Even when photographing seascapes at a reasonable distance from the shore, I’ve seen huge waves strike rocky coastlines, sending massive splashes of water 50 feet into the air — not a good way to give your camera a cleaning!
Salt water is the biggest enemy of electronics — even if you don’t have any direct contact with waves, the fine mist that drifts through the air along the coast will deposit tiny salt water droplets on your camera and lens. After a day of photographing seascapes, you’ll want to carefully and thoroughly clean your camera equipment to make sure none of this salty residue remains. 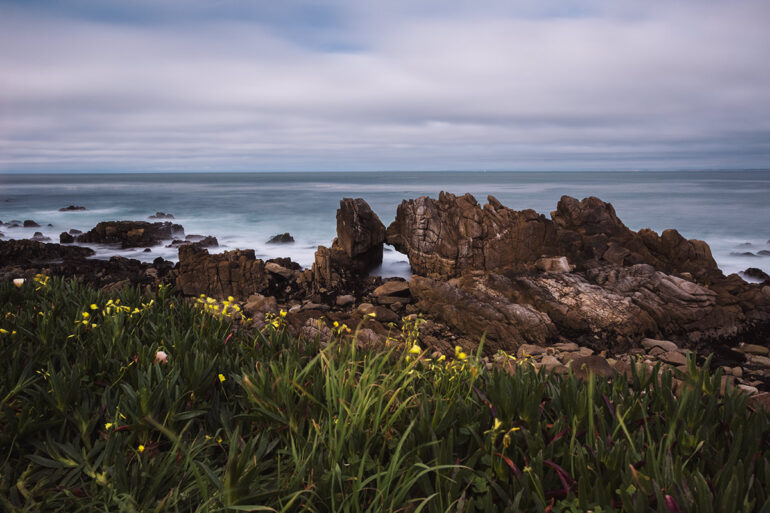
5. Darken skies and reduce glare
A polarizing filter is an indispensable piece of gear for the seascape photographer. Depending upon the angle of the sunlight, polarizing filters can help improve color saturation and contrast, darken the sky, and reduce the glare on reflective surfaces like the water. To achieve the desired effect, you’ll just need to slowly rotate the filter.
6. Think about composition
There’s always an option to shoot abstract seascape photography, but for most of your shots, you’ll want to identify a particular focal point to anchor your shot. Often, figuring out the focal point for your seascape photograph is pretty easy since it might be the most obvious thing around like a huge fishing pier, a lighthouse, or a rocky cliff looming above the sea.
Sometimes, your focal point might be less obvious though, and it’s important to think outside the box and look for smaller subjects like flowers, pebbles, and shells in the foreground.
7. More sea vs. more sky
When composing a seascape image, you’ll generally want to avoid placing the horizon right in the center of the photo, but it’s often tough to decide between including more sky in the composition or including more of the foreground landscape and ocean. There’s no right answer, but usually you should include more of whatever is most interesting. If there’s a firey sunset overhead, your image will probably be stronger if you include more of the sky — if the sky is drab and overcast but the ocean is churning around the rocks, clearly including more sea than sky would be the right approach.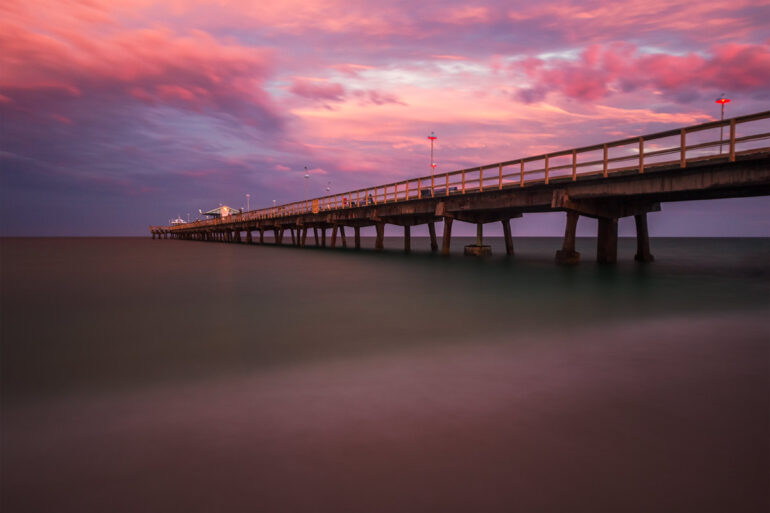
8. Guide the viewer into your shot with leading lines
Leading lines can help guide the eye into your photo, and can help form part of a very strong composition. These lines often “lead” the eye towards the subject of the photo, but in seascape photography they might also lead the viewer into the distance towards the horizon. Although many manmade features along the coastline can make for very obvious leading lines like piers, docks, seawalls, and fences, even natural elements like the ripples on the sand and the straight cracks in the rocky shoreline can form leading lines.
9. Include a human element
Excluding humans from our compositions is something that comes naturally to a lot of photographers, especially those of us who love the natural beauty of the ocean and might even head to the coast to escape the human element. Including the human element – and even people, might not be the first thought, but it can actually make for great compositions and helps to add a sense of scale to images. Footprints in the sand, lifeguard stands, beach chairs and umbrellas, and even people can all help to not only add scale but also help your viewer to really connect with a photo.
 10. Look for reflections
Nothing doubles the beauty of a seascape scene like capturing reflections! On perfectly calm days, the ocean can look like a mirror, reflecting the sky and the shoreline. On rougher days, the wet sand near the shore often captures the reflection of the coast and the sky as the water retreats after each wave. If you’re lucky enough to be photographing in an area with tide pools, you’ll find endless reflections in these pools!