We may earn a commission when you purchase through affiliate links. Learn more.
The Gear
Camera: Sony Alpha a7 Mirrorless Digital Camera
Lens: Sony Sonnar T* FE 55mm f/1.8 ZA Lens
The Settings
ISO: 200
Aperture: f/1.8
Shutter Speed: Shutter Speed
The Process
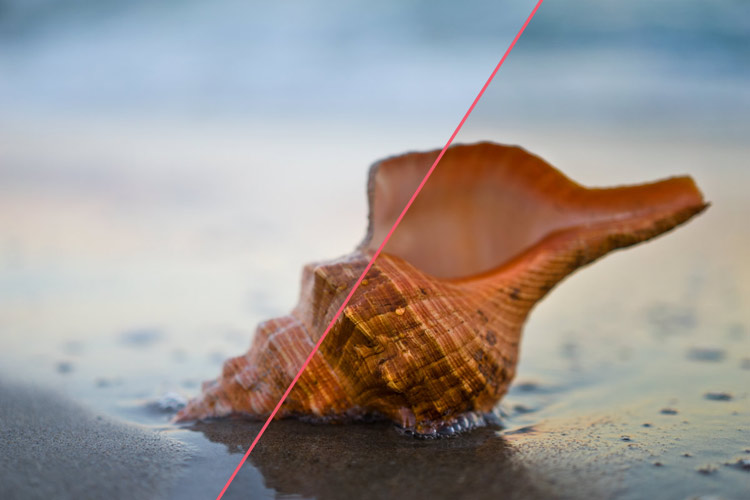
Sunset is always one of my favorite times for photography, so I headed down to the beach with a few shells I’ve found while free-diving to set them up in the surf. Sunset is a tricky time for photography, and with constantly changing lighting conditions it’s pretty easy to end up with shots that are slightly over or under-exposed.
I placed this horse conch (Florida’s state shell) in the sand where incoming waves would just reach it. The Sony A7 has an articulated LCD screen which makes it pretty easy to compose very low angle shots like this without actually having to lay on the ground yourself, but I ended up getting pretty sandy nonetheless while taking this shot. As the sun was setting and the waves were pushing water up beyond the shell, the wet sand became very reflective and had a beautiful rainbow colored sheen that lingered for a few moments after each wave. I wanted the shell to be the focal point of the photo, so I used the lens’s maximum aperture of f/1.8 for a very shallow depth of field.
I processed the image with Adobe Camera RAW and since the image was slightly overexposed and lacked contrast it need a few adjustments to give it the impact I wanted. Since I shoot in RAW I don’t usually worry too much about the white balance settings while I’m shooting, so I warmed the color temperature up a little to 5700. Contrast was increased to +81 and Clarity was increased to +100. The clarity slider helps to enhance detail, and while it’s not the right thing to use for every photo (it tends to look terrible on portraits, for instance) it can really help enhance a photo like this. To capture the vivid colors of the shell and the sunset reflecting in the wet sand, I bumped the vibrance up to +38 while leaving the saturation alone. Because the sand behind the shell was a bit brighter than I wanted, I used the Recovery slider to bring back some of the lost detail in the highlights, setting this to +78.
I opened the image as a 16 bit file in Adobe Photoshop to make a few minor changes. To improve the detail and contrast on the shell slightly, I dodged and burned a few small areas, increasing the highlights and shadows. There were some small clumps of sand on the inside lip of the shell, visible as little blurry blobs in the before photo. To get rid of these I used the Spot Healing Brush tool and the Clone Stamp Tool, depending upon their location. While it might sound like a lot of steps, in reality the processing of this photo took only a few minutes.